Below are the general settings we recommend for users of SmarterMail in our Shared Hosting Environment.
If you are in a cloud or dedicated environment or if the settings below are not working for you, please contact us so we can review your settings and mail server and advise further.
We configure your mail server with a DNS record of: MAIL.DOMAIN.COM
(where domain.com is your actual domain name).
This format will be used in the settings below but make sure to use your real domain name when entering these settings in your email client or browser.
Smartermail can be accessed via Web Browser at the following URL:
http://mail.domain.com
To configure your E-Mail client, use the following settings:
INCOMING MAIL SERVER: mail.domain.com
OUTGOING MAIL SERVER: mail.domain.com
INCOMING MAIL SERVER PORT:
If you are configuring your emails using POP3:
110 (POP3),
995 (POP3 implicit SSL/TLS)
NOTE: POP3 supports only one-way synchronization; there is no two-way sync with POP3 as there is with IMAP)
If you are configuring your emails using IMAP (recommended):
143 (IMAP),
993 (IMAP implicit SSL/TLS)
SMTP PORT: 25 or 2525
(if you are configuring secure mail using TLS you will need to use port 25)
SSL/TLS encrypted SMTP uses port 465
Change or update email account settings in Outlook for Windows
The steps in this support article below apply to you if you use any of the following versions of Microsoft Outlook:
Outlook for Microsoft 365
Outlook 2019
Outlook 2016
Outlook 2013
Outlook 2010
Sometimes you need to make a change to your email account settings. If you have a new password, if your email provider has asked you to change settings, or if you’re having problems with sending and receiving email, you can change your email account settings through Mail in the Windows Control Panel, or from Outlook.
Update or change your email settings from Mail in Control Panel
Want to see how it’s done? Click here to jump directly to our video instructions.

You’ll need to know your account type, the incoming and outgoing server names, and the SSL and port settings for your email account. You can either contact your email provider or, if you’re using a popular email service, you can find these settings in the POP and IMAP email settings for Outlook topic.
Unsure who your email provider is? Look at your email address. The word immediately after the @ symbol is usually your email provider.
- Open the Control Panel.
- Windows 10: In the search box on the taskbar, type control panel, and then select Control Panel.
- Windows 8.1: Type control panel in the search box, and then select Control Panel.
- Windows 7: Click the Start button, and then click Control Panel.
- In Control Panel, search for and open the Mail icon.
- On the Mail Setup – Outlook window, click Email Accounts…
- On the Account Settings window, select the account you’re trying to troubleshoot and select Change.
- On the Change Account window, check the Incoming mail server and Outgoing mail server settings against those from your email provider or the reference article. If it’s different, update the settings.
- Under Logon Information, verify you’re using the correct User Name and Password associated with your email account.
Note: If your email provider requires two-factor authentication, enter the generated passcode they provided instead of your regular password.
- Click More Settings…
- On the Internet Email Settings window, select the Advanced tab.
- Under Server Port Numbers, compare the Incoming server (IMAP) and Outgoing server (SMTP) numbers to those provided by your email provider or from the reference article. If they don’t match, manually change them.
- Additionally, compare the encryption types (next to Use the following type of encrypted connection) for both Incoming and Outgoing servers as well and, if they don’t match, manually change them.
- Click OK, and then click Test Account Settings on the Change Account window.
- On the Test Account Settings window, check if you have green check marks or red markers:
- Red markers indicate some or all settings are incorrect. Check your settings and test again. If the test fails, contact your email provider to verify the information.
- Green check marks indicate a successful test. Click Close, and then click Next and Finish on the Change Account window. Your email should be properly configured.
Want to see how it’s done?
Update or change your email settings in Outlook for Windows
- Open Outlook and select File.
- Use the dropdown under Account Information to select the account you want to change.
- Select Account Settings.
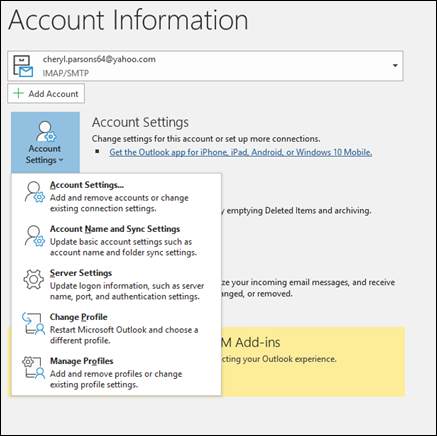
- Select the type of information you want to change.
- Account Settings allows you to add or remove accounts, change server settings, and more.
- Account Name and Sync Settings lets you update the friendly name for the account and decide how many days’ worth of email you’d like to synchronize.
- Server Settings lets you change the login information, including the password, server name, port, and authentication settings.
- Change Profile lets you switch to a new profile.
- Manage Profiles lets you add or remove profiles or change profile settings.
- The most common settings you’ll change are Server Settings.
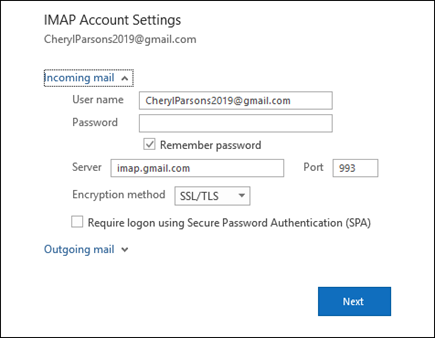
- Select either Incoming mail or Outgoing mail to change a variety of server settings. This is also where you can update your email password (after you’ve changed the password with your email provider).
- When you’re done updating your settings, select Next > Done.
Content retrieved from: https://support.appliedi.net/kb/a1035/what-are-my-email-settings-for-outlook-mac-mail-thunderbird-etc.aspx.