To install FTP, we recommend using Web Platform Installer. Install FTP from this page:
http://www.iis.net/download/FTP
(click the large "Install" button on that page. The FTP option is found under the Web Server section of Web Platform Installer)
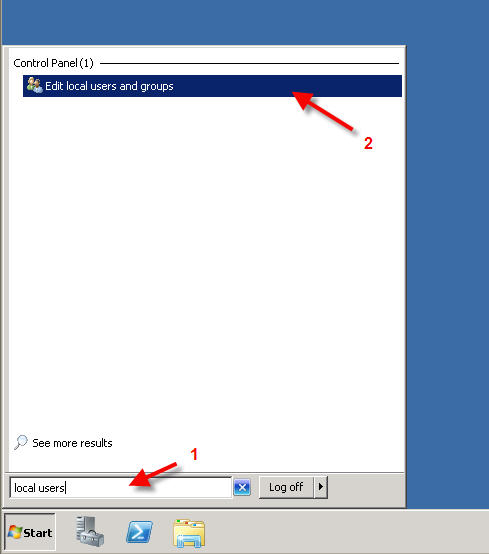
Once installed on your server, go to the START menu, and in the search box, type "local users", then click on the link "Edit local users and groups"
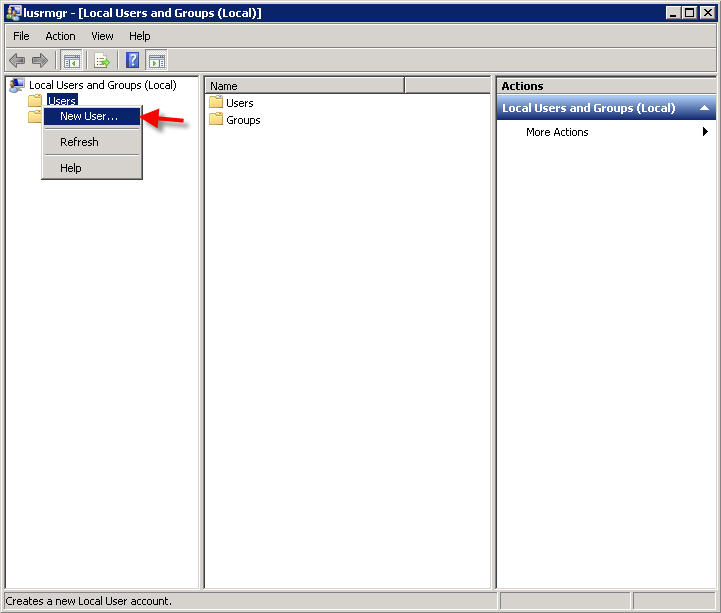
The Local Users and Groups panel will then open. Right click on the "Users" folder, and select "New User…"
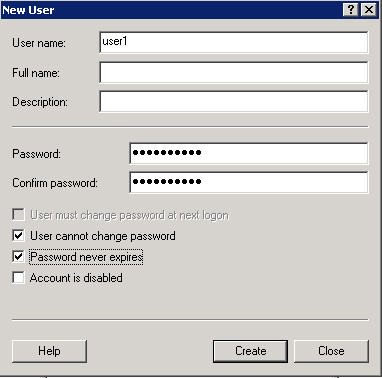
Add your new user:
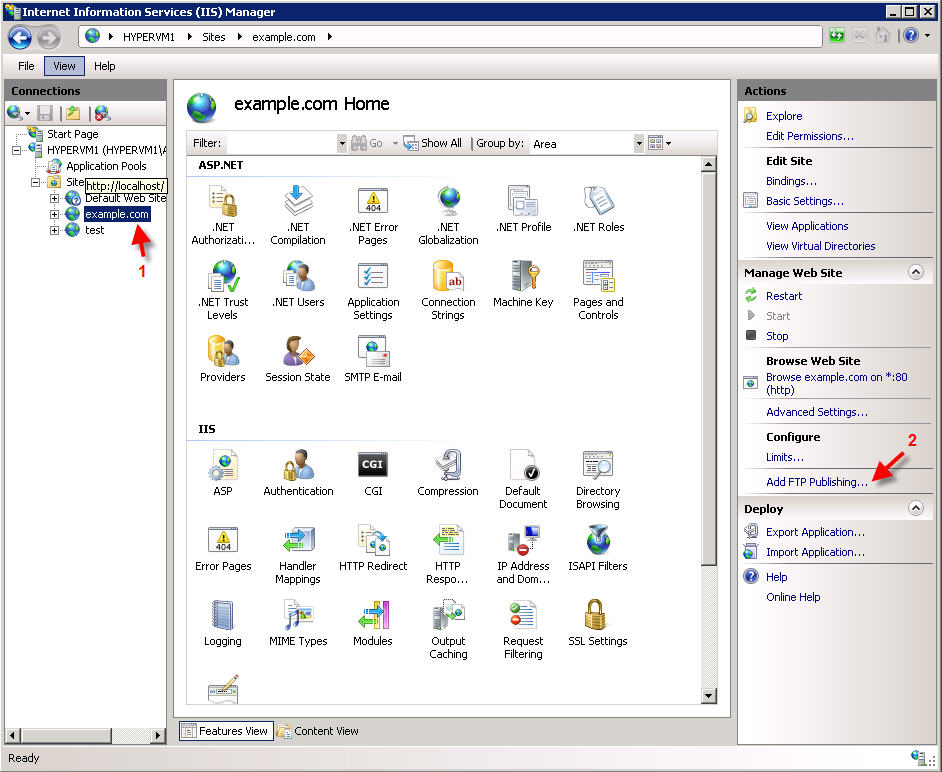
To add the new user to an existing web site, open IIS Manager, select the web site, and click the ‘Add FTP Publishing" link:
– Note: if you don’t see this link, first install FTP Publishing Service 7.5:
1. Go to StartMenu and Select Microsoft Web Platform Installer
2. Under the Web Platform tab, select customize and check off FTP Publishing Service 7.5
Configure the FTP site according to your preferences. In this example below, are are enabling Virtual Host Names so that you can set up FTP sites on the same IP address.
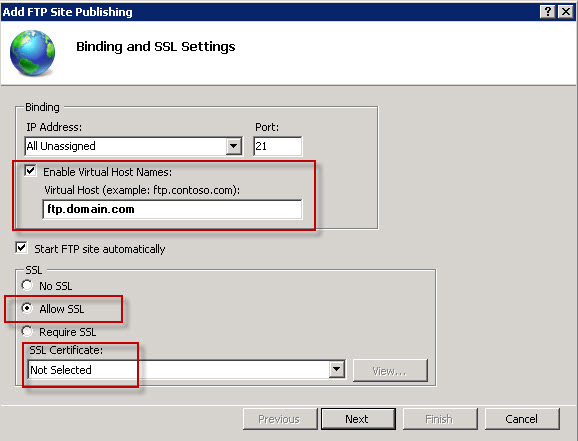
Click Next..
And on the next screen:
- set the Authentication mode to ‘Basic‘
- set ‘Allow access to’ to ‘Specified users’
- enter the username you created earlier
- set permissions to Read and Write if this user should have both read and write permissions (required if you want them to be able to upload to the site)
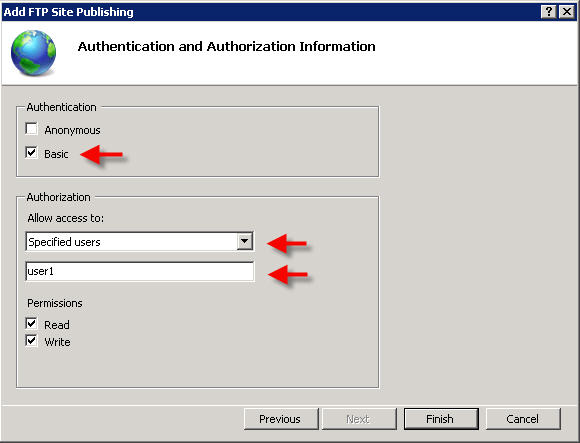
Click Finish.
FTP USERNAME:
TO LOG IN, SINCE ARE USING VIRTUAL HOST NAMES, you must enter the FTP username in this format: virtualhostname|username
For example, in the above steps we have a virtual host name of ftp.yourdomain.com, and a username of "user1", so the FTP username would be:
ftp.yourdomain.com|user1
FIREWALL:
If Windows Firewall is enabled on your server, you will also need to adjust your firewall settings to allow FTP. The easiest way to do this is by command line.
Note that to run these commands, you must run the command line as Administrator:
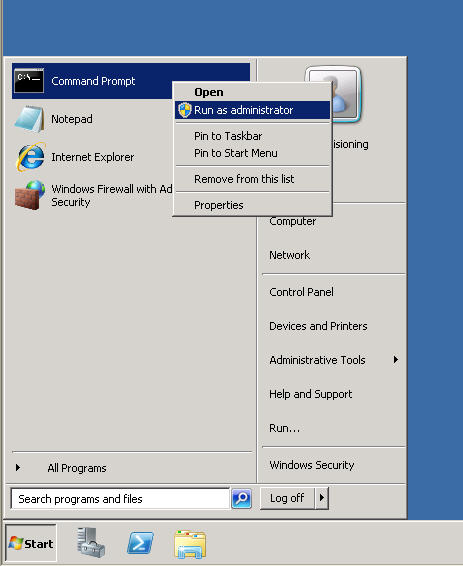
then simply paste the commands below according to your needs:
For example:
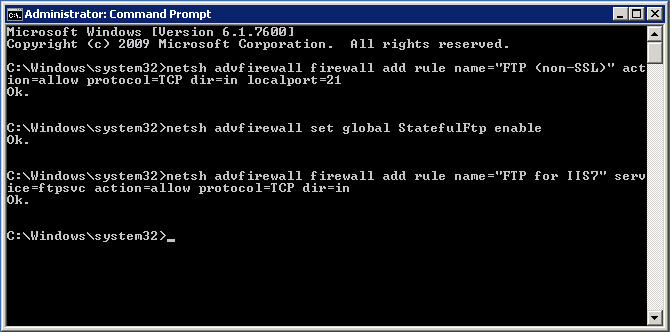
Here are the commands to run and explanation of each:
To configure Windows Firewall to allow non-secure FTP traffic, use the following steps:
- Open a command prompt: click Start, then All Programs, then Accessories, then Command Prompt.
- To open port 21 on the firewall, type the following syntax then hit enter:
netsh advfirewall firewall add rule name="FTP (non-SSL)" action=allow protocol=TCP dir=in localport=21
- To enable stateful FTP filtering that will dynamically open ports for data connections, type the following syntax then hit enter:
netsh advfirewall set global StatefulFtp enable
Important Notes:
- Active FTP connections would not necessarily covered by the above rules; an outbound connection from port 20 would also need to be enabled on server. In addition, the FTP client machine would need to have its own firewall exceptions setup for inbound traffic.
- FTP over SSL (FTPS) will not be covered by these rules; the SSL negotiation will most likely fail because the Windows Firewall filter for stateful FTP inspection will not be able to parse encrypted data. (Some 3rd-party firewall filters recognize the beginning of SSL negotiation, e.g. AUTH SSL or AUTH TLS commands, and return an error to prevent SSL negotiation from starting.)
The stateful FTP packet inspection in Windows Firewall will most likely prevent SSL from working because Windows Firewall filter for stateful FTP inspection will not be able to parse the encrypted traffic that would establish the data connection. Because of this behavior, you will need to configure your Windows Firewall settings for FTP differently if you intend to use FTP over SSL (FTPS). The easiest way to configure Windows Firewall to allow FTPS traffic is to list the FTP service on the inbound exception list. The full service name is the "Microsoft FTP Service", and the short service name is "ftpsvc". (The FTP service is hosted in a generic service process host (Svchost.exe) so it is not possible to put it on the exception list though a program exception.)
(OPTIONAL)To configure Windows Firewall to allow secure FTP over SSL (FTPS) traffic, use the following steps:
- Open a command prompt: click Start, then All Programs, then Accessories, then Command Prompt.
-
To configure the firewall to allow the FTP service to listen on all ports that it opens, type the following syntax then hit enter:
netsh advfirewall firewall add rule name="FTP for IIS7" service=ftpsvc action=allow protocol=TCP dir=in
- To disable stateful FTP filtering so that Windows Firewall will not block FTP traffic, type the following syntax then hit enter:
netsh advfirewall set global StatefulFtp disable
(source: http://learn.iis.net/page.aspx/309/configuring-ftp-firewall-settings/)
Troubleshooting:
There are various ways to configure FTP / Windows Firewall depending on the version of IIS7 and version of FTP you have installed.
If you are unable to connect via Passive FTP mode, after entering the firewall commands under the Non-SSL section above, please try the following:
In your Windows Command Prompt, enter the following commands:
mkdir "%SystemDrive%inetpubftproot"
ICACLS "%SystemDrive%inetpubftproot" /Grant IUSR:R /T
netsh int ipv4 set dynamicport tcp start=10000 num=1000
Manually create a firewall rule, in Windows Firewall with Advanced Security, with settings:
Protocol: TCP
Specific Ports: 10000-11000
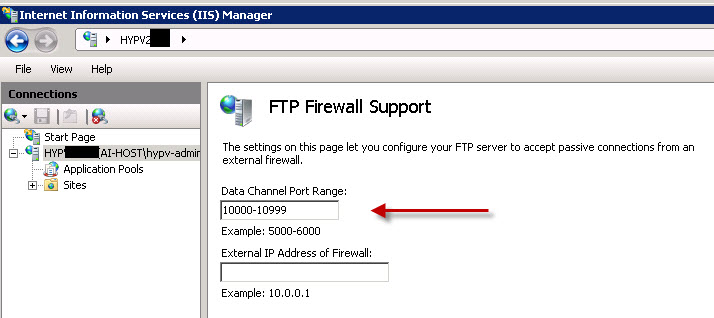
In IIS Manager, right-click on your server name, and enter the following port range:
Content retrieved from: https://support.appliedi.net/kb/a411/how-to-create-an-ftp-user-in-windows-server-2008.aspx.
